
Word for Mac has a built-in autosave feature called AutoRecover which is switched on by default. This means that Word is quietly saving the document you are working on without you needing to manually tell the software to do so.
For this feature to function properly you’ll need to initially save the document with a name, then Word will make incremental saves every ten minutes.
However, if the document was lost because your computer or software shut down unexpectedly then you should be prompted with a recovered file when you relaunch Word, even if you hadn’t saved it yet. In that case you still might be able to find a version of it in the AutoRecovery folder.
The way this works depends on the version of Word for Mac you are using. We’ll look at each separately below.
Here’s how to find AutoRecover in Word 2016:

If you are using Word 2011 it’s easy to locate the AutoRecovery folder:
Even if you don’t find your document in the AutoRecovery folder, it may not be the case that it isn’t there. Files in the AutoRecover folder don’t always show up.
We have first-hand experience of this. In the past, our Mac has ‘helpfully’ saved a Word document in the Office 2011 AutoRecovery folder. This would not be an issue, except for the fact that when we then accessed the folder (just a quick search in Spotlight for Office 2011 AutoRecovery) the files were nowhere to be seen.
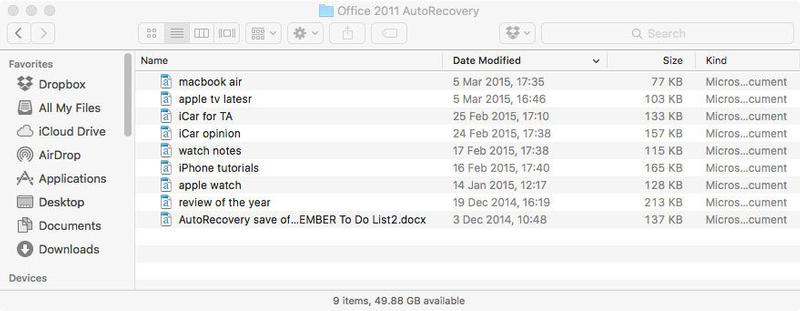
As you can see from this screen grab, the most recent file in our AutoRecovery folder was from 5 March, but we know that there are more recent files saved there.
The problem with the AutoRecovery file is that it is located in a Library folder that isn’t visible by default, and that will have some impact on whether your files are visible or not.
Fortunately there is a way to locate the file. Here’s how…
If you happen to have a Time Machine backup on an external drive you can roll back to a time when a deleted or corrupted file was still on your system.
Go to the folder where you’d hope to see your file, or an earlier verision of your file. You could even try the AutoRecovery folder mentioned above for example.
Open Time machine and flick back through the day, weeks or months to see if your file is there. We’ll keep our fingers crossed for you.
If you are unfortunate enough not to have a backup routine then we suggest beginning one immediately. Macs are very reliable machines, but there is always a risk of something going wrong, so it’s best to protect yourself against potential disaster.
What if you never saved your file – if in a moment of madness you clicked on Don’t Save rather than Save? It happens! Can you retrieve your file?
Your Mac also has a folder where it might temporarily keep files. The Temporary folder isn’t easy to find though.
To find the Temporary folder, use Terminal (find it in Applications > Utilities > Terminal, or Spotlight search for Terminal by pressing Command + Space.
Inside this TMP folder you’ll should find a folder called Temporaryitems. It’s possible that your document might be inside.
It goes without saying that you should save frequently especially if your Mac can be a bit unreliable.
You may be able to rely on Word autosaving for you, but remember that you have to save the file first to really benefit from Autosave.
A helpful thing to know is that you can reduce the gaps between autosaves on Word for Mac. By default they are set at ten minute intervals, but it’s easy to make them more frequent.
In Word go up to the Menu bar at the top of the screen and click on Word. From the dropdown menu select Preferences and then in the Output and Sharing section you’ll see a disk icon named Save. Click this and you’ll now be able to adjust the time between saves by entering a value into the ‘Save every X minutes’ box at the bottom.
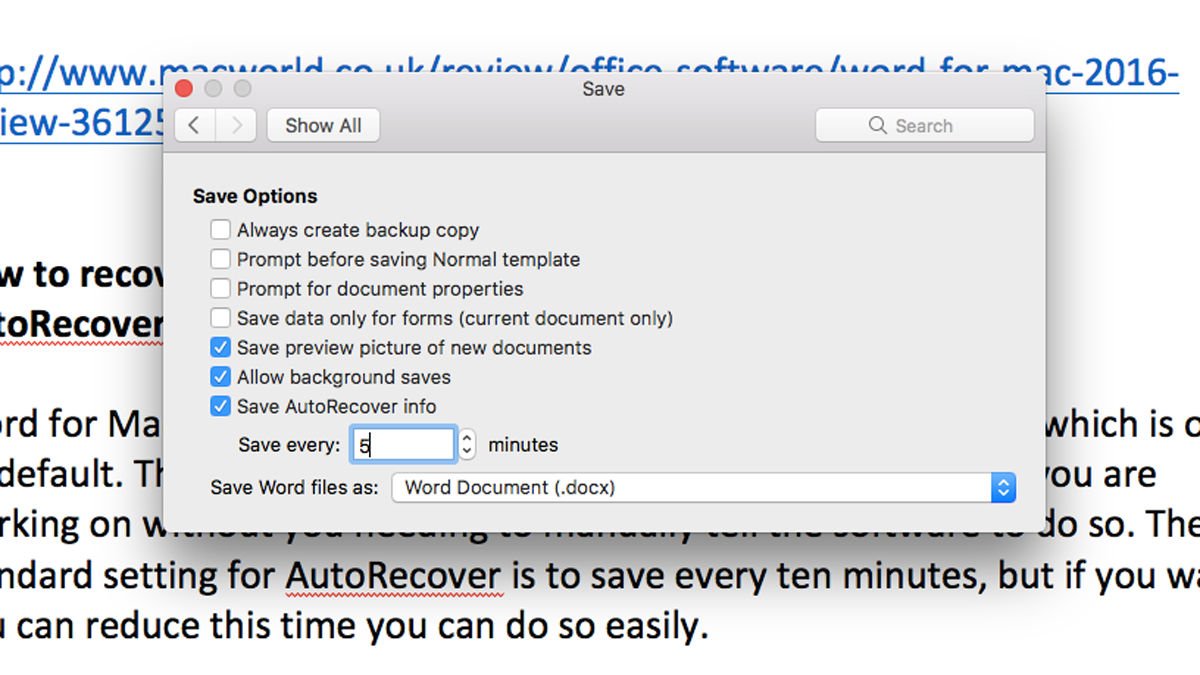
While it might be tempting to set it as low as possible, bear in mind that Word’s performance will be hampered slightly if it’s saving every minute, especially if you are working on a big file. Experiment to see what setting works best for you.